Intro to Home Automation for the Parents
I live in Colorado, my parents in Florida, but I usually head there for the holidays and this year I planned on introducing them to some basic home automation. As anyone reading this blog likely knows, there are thousands of different products out there, all with different levels of support and security. I've learned some of those lessons on my own home automation setup and hoped to apply the learnings to my parents' house.
Goals
- Extremely easy to use and maintain. My parents aren't technical and I want them to have an "it just works" experience.
- Be able to run BirdNet-Go, bird song identification software.
- Use Home Assistant. I have a lot of experience with it, the iOS app just works (after being set up), and it has tons of flexibility.
- Be able to administer it remotely from my home in Colorado to update software.
Approach
Knowing I was using Home Assistant and that my parents' home was a relatively small (for US homes) single-floor 2000 sq foot home with limited WiFi coverage, I leaned into using Zigbee for as much as I could. I wanted to avoid as much hardwiring as possible in case this wasn't for them. With some consulting I landed on the following BOM:
- Raspberry Pi 4, 4GB with 3D printed case and 64GB card (items I already had)
- 2 outdoor Aqara cameras (good camera, mic, and integration with HA and HomeKit)
- Meross Smart HVAC Controller (WiFi unfortunately)
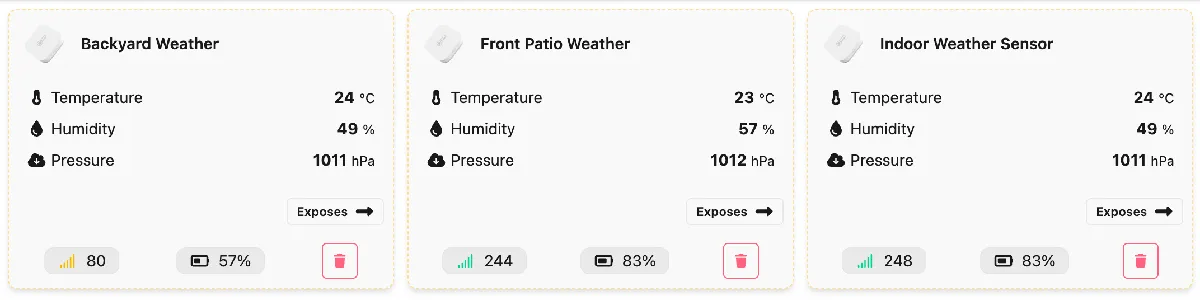
- Aqara Zigbee Thermometers 3 pack
- Third Reality Zigbee Smart Switches 4 pack
- Aqara Zigbee Leak Sensors 3 pack
- Sonoff Zigbee Radio
As you can see I went heavily on Aqara. A few reasons made sense to me: if Home Assistant starts to not work for them or goes down, the Aqara ecosystem will still work. The Aqara camera has a Zigbee hub and could connect those devices. They would lose BirdNet and some other stuff but the hardware wouldn't be useless. It's also dead simple to set up.
Initial Setup
While I was still in Colorado I started with flashing the SD card, setting up myself as an admin, and installing a few add-ons that would make remote access easy: Cloudflared and Tailscale.
I chose Cloudflared because it will lock down all ports other than the main Home Assistant and it will make external access easy with a dedicated subdomain. I also used Tailscale because I use it myself and my devices are always on the network, so I would quickly be able to debug issues remotely for my parents by setting up the Pi as a way to access their full network.
I then installed HACS so I would have access to a bunch more plugins and front-end themes.
From there I added the MQTT add-on, set up creds, installed the Zigbee2MQTT add-on, and added the creds I set up.
Lastly I installed but didn't configure BirdNet-Go.
I also set up user accounts for them, saved the passwords in our password manager, and added some basic theming. From there I was ready to go to Florida.
Device Setup
Getting to Florida I unpacked all the devices I shipped there and started getting everything set up. I started with getting the Pi wired into their router. Turns out they didn't have an ethernet cable, so we set up the cameras instead. That was pretty straightforward and Aqara walks you through it.
When I got an ethernet cable we were back up and running. I started by installing the Zigbee radio and setting up Zigbee2MQTT, ensuring everything was up and running.
Leak Sensors
From there I started with the leak sensors. It was as simple as pulling a pull tab separating the battery, holding down a button, tapping "allow join" in the Zigbee2MQTT UI, and voilà—the device was found. I named it and it was adopted into the network.
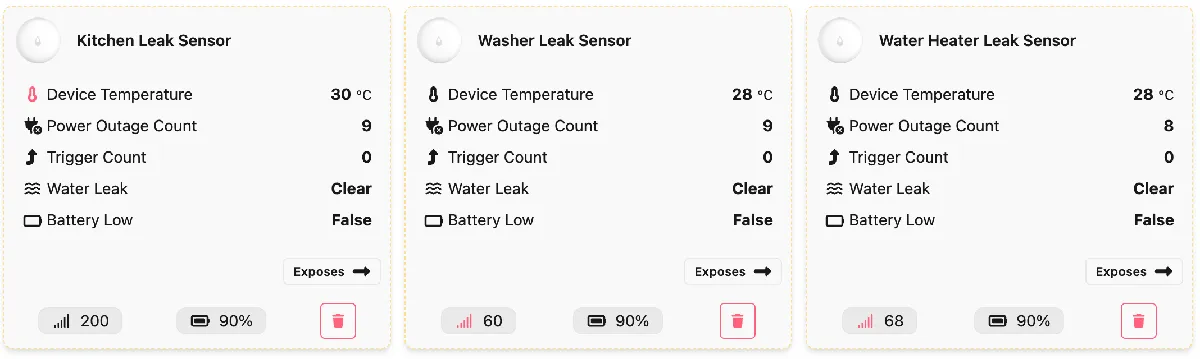
We found where to place them around the house and did a few tests to make sure the state would change. Voilà.
Temp Sensors
These followed the same exact method except they came with double-sided tape, so we had a good debate about where they belonged. We landed on one under the front patio, one under the back patio, and one in the kitchen away from the stove.
Smart Switches
Since these are by Third Reality they automatically went into pairing mode when plugged in, so these were even simpler. They also act as hubs which should repeat any Zigbee requests to the hub. They also track usage which is nice if these were powering high-power devices.
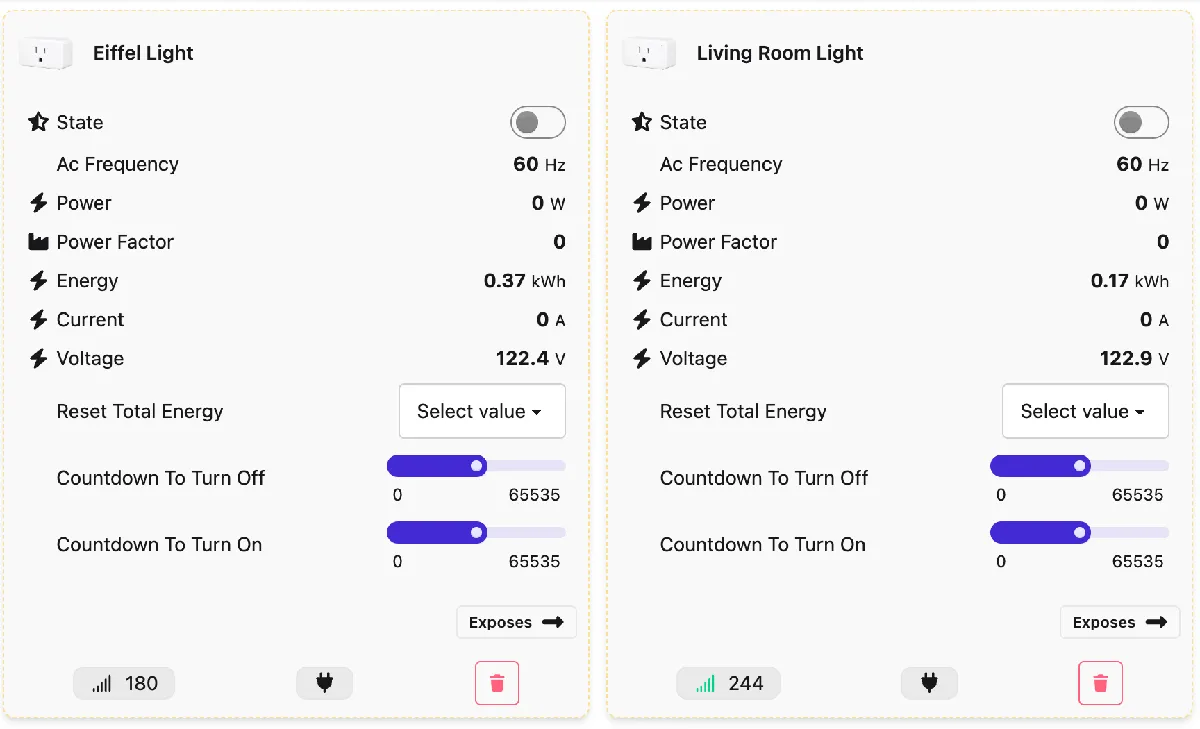
I set up some automations here; simple ones that look for if no one is home and then are arriving home to turn on the hallway and entranceway lights if they are not already on.
Thermostat
Nothing too fancy here, just the default Home Assistant addition. I don't like messing with automations when it comes to thermostats as it can be a costly mistake.
Cameras
Not too much to say on these. They are great quality and allow for an RTSP stream of audio I can send to BirdNet. I didn't do anything outside of the ordinary other than setting up WebRTC camera to lighten the load on the Raspberry Pi when streaming the feed to the UI. The card setup is pretty straightforward:
type: custom:webrtc-camera
url: aqara_g5_sub
mode: webrtc
ui: true
streams:
  - url: aqara_g5_sub
    name: SD
  - url: aqara_g5_main
    name: HD
With the WebRTC device set up like this:
streams:
  aqara_g5_main:
    - rtsp://user:pass@192.168.1.44:8554/ch1

  aqara_g5_sub:
    - rtsp://user:pass@192.168.1.44:8554/ch4

  aqara_g5_audio:
    - "ffmpeg:rtsp://user:pass@192.168.1.44:8554/ch4#audio=pcm"

  aqara_100_main:
    - rtsp://user:pass@192.168.1.45:8554/ch1

  aqara_100_sub:
    - rtsp://user:pass@192.168.1.45:8554/ch3
As you can see I have an audio-only stream for use with BirdNet.
BirdNet
This was the main reason for this whole project. Getting BirdNet-Go installed was pretty easy but getting it to play well in HA was a bit more annoying. I approached it with a few different goals in mind:
- Since this is running on an SD card I didn't want to record audio. The sample ones on All About Birds sound better anyway, so let's just link to those pages.
- I want to make sure the cameras are facing where the birds are so the stream can pick it up.
- I want HA to just show basic information and not replace the BirdNet UI entirely.
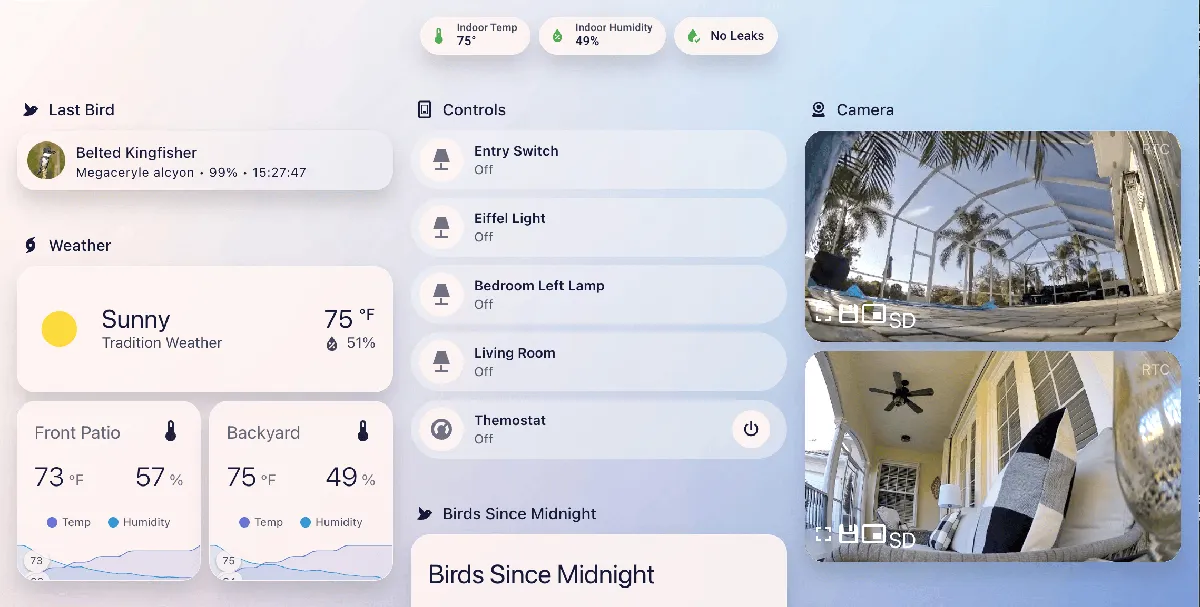
So what I did is take a blend of the BirdNet docs and some of my own code and end up having these nice two simple UIs in Home Assistant:
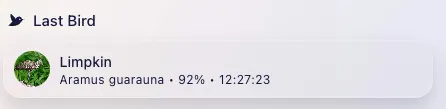
The Last Bird card is the following:
type: vertical-stack
cards:
  - type: custom:mushroom-template-card
    entity: sensor.birdnet_go
    primary: "{{ state_attr('sensor.birdnet_go', 'CommonName') }}"
    secondary: >-
      {{ state_attr('sensor.birdnet_go', 'ScientificName') }} • {{
      (state_attr('sensor.birdnet_go', 'Confidence') * 100) | round(0) }}% • {{
      state_attr('sensor.birdnet_go', 'Time') }}
    picture: "{{ state_attr('sensor.birdnet_go', 'BirdImage')['URL'] }}"
    features_position: bottom
    multiline_secondary: true
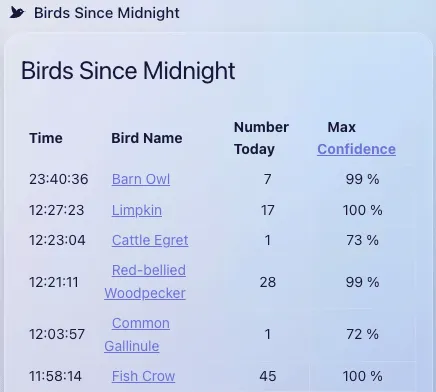
And for the Birds Since Midnight:
type: markdown
title: Birds Since Midnight
content: >-
  Time|  Bird Name|Number Today|    Max
  [Confidence](http://192.168.1.3:8080/)

  :---|:---|:---:|:---:

  {%- set t = now() %}

  {%- set bird_list = state_attr('sensor.birdnet_go_events','bird_events') |
  sort(attribute='time', reverse=true) | map(attribute='name') | unique | list
  %}

  {%- set bird_objects = state_attr('sensor.birdnet_go_events','bird_events') |
  sort(attribute='time', reverse=true) %}

  {%- for thisbird in bird_list or [] %}

  {%- set ubird = ((bird_objects | selectattr("name", "equalto", thisbird)) |
  list)[0] %}

  {%- set ubird_count = ((bird_objects | selectattr("name", "equalto",
  thisbird)) | list) | length %}

  {%- set ubird_max_confidence = ((bird_objects | selectattr("name", "equalto",
  thisbird)) | map(attribute='confidence') | map('replace', '%', '') |
  map('float') | max | round(0)) %}

  {%- if ubird_max_confidence > 70 %}

  {{ubird.time}}
  |  [{{ubird.name}}](https://www.allaboutbirds.org/guide/{{ubird.name
  | replace(' ', '_')}}) | {{ubird_count}} | {{ ubird_max_confidence }} %

  {%- endif %}

  {%- endfor %}
card_mod:
  style:
    $: |
      .card-header {
        display: flex !important;
        align-items: center;
      }
      .card-header:before {
            content: url("data:image/svg+xml;base64,REDACTED");
            height: 20px;
            width: 60px;
            margin-top: -10px;
            padding-left: 8px;
            padding-right: 18px;
      }
This can certainly be improved, and I would love any comments on how!
Getting this data to be available to the UI means I need to add this to my config.yaml:
mqtt:
  sensor:
    - name: "Birdnet-Go"
      state_topic: "birdnet"
      value_template: "{{ today_at(value_json.Time) }}"
      json_attributes_topic: "birdnet"
      json_attributes_template: "{{ value_json | tojson }}"
    - name: "Birdnet-Go Bird Image Url"
      state_topic: "birdnet"
      value_template: "{{ value_json.BirdImage.URL }}"
    - name: "Birdnet-Go Clip Name"
      state_topic: "birdnet"
      value_template: "{{ value_json.ClipName }}"
    - name: "Birdnet-Go Common Name"
      state_topic: "birdnet"
      value_template: "{{ value_json.CommonName }}"
    - name: "Birdnet-Go Confidence"
      state_topic: "birdnet"
      value_template: "{{ (value_json.Confidence | float * 100) | round(2) }}"
      unit_of_measurement: "%"
    - name: "Birdnet-Go Date"
      state_topic: "birdnet"
      value_template: "{{ value_json.Date }}"
    - name: "Birdnet-Go ProcessingTime"
      state_topic: "birdnet"
      value_template: "{{ (value_json.ProcessingTime | float / 1000000000 ) | round(4) }}"
      unit_of_measurement: "s"
    - name: "Birdnet-Go Scientific Name"
      state_topic: "birdnet"
      value_template: "{{ value_json.ScientificName }}"
    - name: "Birdnet-Go Sensitivity"
      state_topic: "birdnet"
      value_template: "{{ value_json.Sensitivity }}"
    - name: "Birdnet-Go Source"
      state_topic: "birdnet"
      value_template: "{{ value_json.Source }}"
    - name: "Birdnet-Go Species Code"
      state_topic: "birdnet"
      value_template: "{{ value_json.SpeciesCode }}"
    - name: "Birdnet-Go Threshold"
      state_topic: "birdnet"
      value_template: "{{ value_json.Threshold }}"
    - name: "Birdnet-Go Time"
      state_topic: "birdnet"
      value_template: "{{ today_at(value_json.Time) }}"

template:
  - trigger:
      - platform: mqtt
        topic: "birdnet"
        id: birdnet
      - platform: time
        at: "00:00:00"
        id: reset
    sensor:
      - unique_id: c893533c-3c06-4ebe-a5bb-da833da0a947
        name: BirdNET-Go Events
        state: >
          {% if trigger.id == 'reset' %}
            {{ now() }}
          {% elif trigger.id == 'birdnet' %}
            {{ today_at(trigger.payload_json.Time) }}
          {% endif %}
        attributes:
          bird_events: >
            {% if trigger.id == 'reset' %}
              {{ [] }}
            {% else %}
              {% set time = trigger.payload_json.Time | trim %}
              {% set name = trigger.payload_json.CommonName | trim %}
              {% set confidence = trigger.payload_json.Confidence|round(2) * 100 ~ '%' %}
              {% set current = this.attributes.get('bird_events', []) %}
              {% set new = dict(time=time, name=name, confidence=confidence) %}
              {{ current + [new] }}
            {% endif %}
This works quite well, and if you want to hear the bird call you click on its name and it goes over to All About Birds. If you want to see local information it's just a tap into the BirdNet-Go UI:
Automations
Knowing I was going to be remote and I didn't want to do too much to maintain this after I was back in Colorado, I added some quality-of-life automations to keep everything running well.
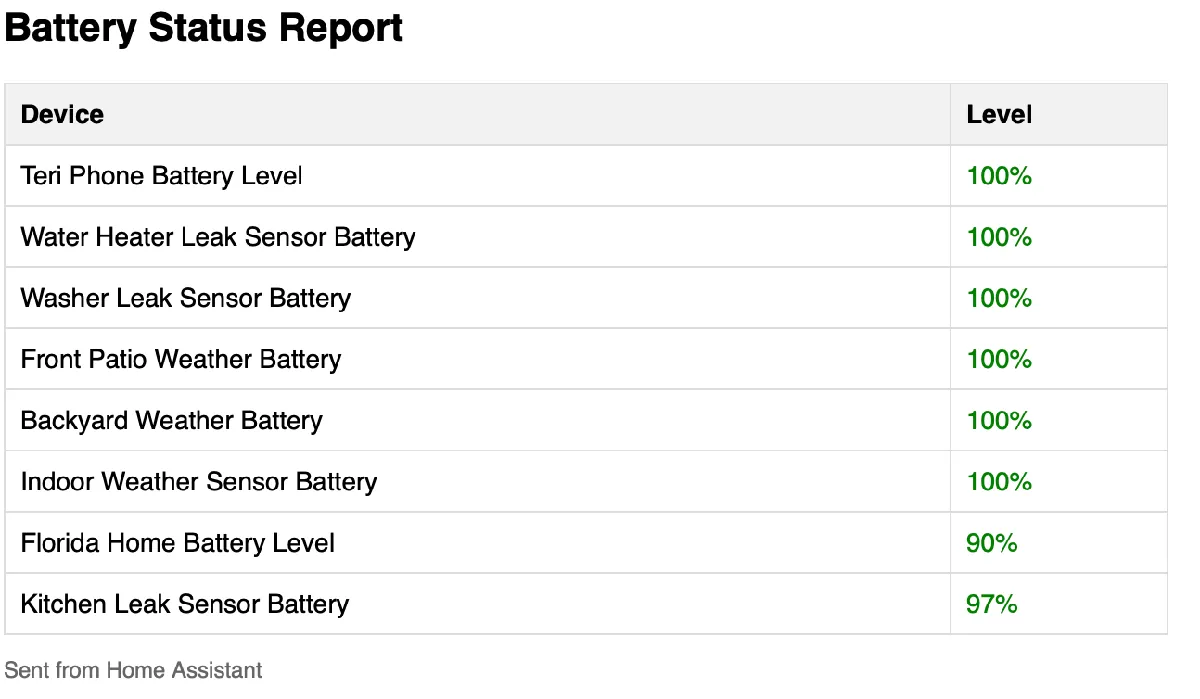
What I think may be of most significant interest is the email sent when batteries of any device are low. This uses a few different methods to determine a battery is low and sends an email using the Mailgun add-on to me and my mother with the device that is low.
That automation is as follows:
alias: Weekly Battery Report
description: Sends a weekly email with all battery statuses
triggers:
  - trigger: time
    at: "09:00:00"
conditions:
  - condition: time
    weekday:
      - mon
  - condition: template
    value_template: |
      {{ states.sensor
         | selectattr('attributes.device_class', 'eq', 'battery')
         | map(attribute='state') | map('int', 0)
         | select('le', 20) | list | count > 0 }}
actions:
  - action: notify.mailgun_daily
    data:
      title: Weekly Battery Report
      message: ""
      data:
        html: >
          <h2>Battery Status Report</h2> <table style="border-collapse:
          collapse; width: 100%;">
            <tr style="background-color: #f2f2f2;">
              <th style="padding: 8px; text-align: left; border: 1px solid #ddd;">Device</th>
              <th style="padding: 8px; text-align: left; border: 1px solid #ddd;">Level</th>
            </tr>
            {% for state in states.sensor
               | selectattr('attributes.device_class', 'defined')
               | selectattr('attributes.device_class', 'eq', 'battery')
               | sort(attribute='state') %}
            {% set level = state.state | int(0) %}
            {% set color = 'red' if level <= 20 else 'green' %}
            <tr>
              <td style="padding: 8px; border: 1px solid #ddd;">{{ state.attributes.friendly_name }}</td>
              <td style="padding: 8px; border: 1px solid #ddd; color: {{ color }}; font-weight: {% if level <= 20 %}bold{% else %}normal{% endif %};">{{ level }}%</td>
            </tr>
            {% endfor %}
          </table> <p style="color: #666; font-size: 12px;">Sent from Home
          Assistant</p>
mode: single
And the email is extremely simple but useful:
To set up Mailgun you can just follow the HA documentation.
Conclusion
Overall this was a fun project to do and helpful for my parents. They are eased into home automation, they get to discover their bird neighbors, and I got to learn some new concepts I can apply to my much more mature Home Assistant installation. It was nice over winter break to not have to focus on my day job and just explore this without deadlines or expectations beyond those I make for myself.
As always, if you have any questions hit me up on Blue Sky and I'll do my best to help out!